Nanopositioning specialist Queensgate and the UK’s National Physical Laboratory (NPL) have forged a productive collaboration yielding a good-practice implementation model for Queensgate’s in-house test and measurement programme

Traceable optical metrology for end-to-end quality assurance (QA) across product design, development and manufacturing provides the raison d’être for a long-running R&D collaboration between Queensgate, a UK manufacturer of high-precision nanopositioning products, and scientists at the National Physical Laboratory (NPL), the UK’s National Metrology Institute. The goal: continuous improvement and technology innovation to support Queensgate’s growing portfolio of piezo-driven nanopositioning stages, piezo actuators, capacitive sensors, control electronics and software – core building blocks for all manner of cutting-edge scientific instrumentation used in diverse fields of optics, microscopy and applied measurement.
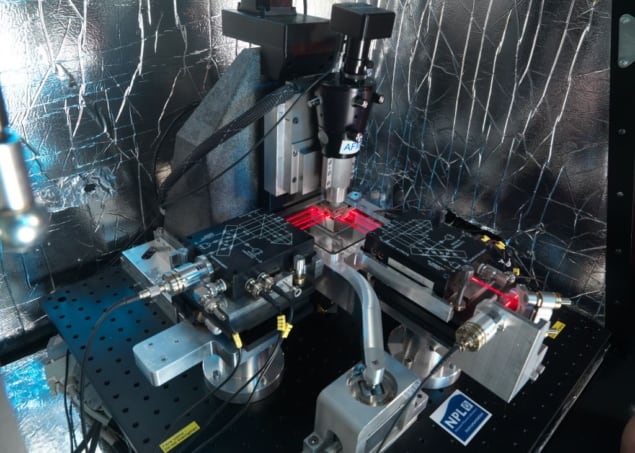
Underpinning the partnership is Queensgate’s use of proprietary NPL innovations and know-how in optical interferometry as the basis of its rigorous test and measurement programme. A case in point is the manufacturer’s deployment of NPL’s very-low-noise conditioning electronics and fringe-counting technologies to achieve a measurement resolution of 20 pm or better when evaluating a system under test – for example, the performance of a nanopositioning stage destined for high-precision metrology applications in the data storage industry.
“At Queensgate, our product QA is all about having that traceability and cross-check versus the NPL’s ‘gold-standard’ primary measurement systems,” explains Sam Frost, production manager and site lead at the company’s manufacturing facility in Paignton, UK. “The task is to ensure that the overall performance, scale factors and linearization coefficients of our nanopositioning stages come out exactly the same whether they’re tested at NPL or here at Queensgate, while also ensuring our in-house measurement processes align with NPL guidance over the long term.”
A win-win partnership
It’s also significant that ideas and innovations flow both ways between the partners, a point emphasized by Andrew Yacoot, principal research scientist leading NPL’s dimensional nanometrology programme and chair of the Working Group for Dimensional Nanometrology of the Consultative Committee for Length (one of ten Consultative Committees that oversee the SI units, the international standards of measurement). “A core part of NPL’s remit is to offer proactive support to UK industry, so it’s great to see this collaboration creating lasting value and commercial differentiation for Queensgate,” he explains.
The research facilities at NPL mean that Yacoot and his team are able to look in detail at the metrology aspects of Queensgate’s next-generation positioning stages and give feedback that informs the product roadmap – for example, with regard to the control, automation and software set-up. “Equally,” he adds, “we often get access to prototype stages customized to our own specific experimental requirements – a result of the strong collaboration we have with the Queensgate development team.”

More broadly, Yacoot and colleagues have supported Queensgate with the implementation of a robust and traceable measurement infrastructure for optical test and calibration of the manufacturer’s nanopositioning product portfolio. As the National Metrology Institute, NPL maintains a state-of-the art capability in optical interferometry, with Queensgate seeing sustained upsides from the laboratory’s specialist domain knowledge and collective capability in this area. “We’re able to advise on the optimum interferometer configuration for product testing, appropriate measurement settings and the measurement strategy more generally,” explains Yacoot.
Meanwhile, the advantage of using NPL’s optical interferometer technologies is the traceability those solutions provide back to the SI standard of length – the metre – via the wavelength of light from calibrated, stabilized lasers used by Queensgate’s interferometers. “From time to time,” adds Yacoot, “we will also cross-check Queensgate’s calibrations of their specialist nanopositioning stages here on our own interferometer systems – effectively validating the test and measurement procedures applied by Queensgate.”
That open-access relationship around optical testing has seeded several other joint R&D projects, in many cases co-funded by the UK government’s Department for Business, Energy and Industrial Strategy. In a proof-of-concept study completed last year, funded by the Measurement for Recovery (M4R) Programme, an amalgam of enabling technologies from Queensgate – including high-speed, piezo-driven nanopositioning stages and proprietary closed-loop velocity-control algorithms – were road-tested by NPL researchers in a series of experiments to evaluate their potential suitability for high-speed scanning applications in atomic force microscopy (AFM). The results showed reliable capture of large-area, high-quality AFM images with nanometre spatial resolution – and all achieved in a matter of minutes, rather than hours or days, at raster scan speeds ranging from 0.5 mm/s up to 4 mm/s.
It’s all about the details
Queensgate, for its part, is pursuing a granular approach to the environmental controls needed to support its in-house interferometric metrology programme. For starters, the manufacturing facility is purpose-built for high-end assembly of photonic and electronic instrumentation (with ambient temperature control to within ±0.5 °C). “Nanometrology is nothing without control,” argues Frost.

“As such, all of our interferometric test systems are enclosed to counter any pressure differentials caused by air currents or even the voices of our technicians. The attention to detail is a must-have given the specified levels of precision we’re seeking in the picometre regime.”
In terms of deployment, those interferometer test systems either sit on an optical isolation table or hang suspended via specially designed rubber cords – both configurations serving to dampen any vibrations coming through the building floor or from doors opening and closing. Equally important is the production quality of the set-up for testing Queensgate’s stages, with the default materials of choice being high-grade stainless steels (rather than aluminium or plastic) and baseplates made from Super Invar (an alloy with a low thermal-expansion coefficient).
Queensgate: collaborating to push the boundaries of measurement science
“Our QA programme is robust and comprehensive and has benefited from NPL’s input into our optical metrology and some intercomparison measurements,” adds Frost. Although there are variations on the theme for one-off products, the standard figures of merit covered in a customer test report include range, linearity error, hysteresis, noise, step response as well as cross-talk and rotational errors – all itemized to show target specifications against real-world measurements. “It’s worth noting there’s a lot of automation underpinning these test routines,” concludes Frost, “with custom algorithms ensuring a streamlined and repeatable process for the verification of our nanopositioning stages.”


