By integrating robotics and machine learning into its latest atomic force microscope, Park Systems has for the first time fully automated the imaging process for research users

Scientists and engineers have for many years relied on atomic force microscopy (AFM) to reveal the secrets of materials at the nanoscale. This powerful and versatile technique, first invented by scientists at IBM and Stanford University in 1985, offers a 3D view of the sample’s surface with sub-nanometre resolution, while different measurement modalities allow researchers to map material phenomena that include frictional, nanomechanical, electrical, magnetic and thermal properties. AFM can also image any type of material in ambient conditions as well as under vacuum and in liquid, which has made the technique a vital tool in all areas of science and technology.

The problem is that time, patience and skill are needed to extract reliable and reproducible data from such a high-precision instrument. “Compared with other microscopy techniques, wide-scale acceptance of AFM is still hampered by complex operation and handling,” says Ryan Yoo, executive vice-president of business development and strategic growth at Park Systems, one of the world’s leading manufacturers of AFMs. “More robust and easier operation will allow more users to adopt AFM for their daily measurement needs.”
An AFM works by scanning a cantilever with a very sharp tip across the surface, with an optical system then used to monitor small deflections of the cantilever caused by surface forces. Before collecting any data the user must first fit the correct tip, often using tweezers, and then manually position it close enough to the sample for the cantilever to interact with the surface. The optical detection system and viewing optics must also be aligned correctly, while a number of different imaging parameters must be chosen or tuned before scanning can start.
Speedy imaging
Park Systems is well aware of these complications, and in recent years has sought to make its AFMs easier to use with features such as pre-mounted tips and a point-and-click software interface. But the company’s latest instrument, the Park FX40, represents a paradigm shift. It integrates robotics and machine learning throughout the design to produce the first research-grade AFM that fully automates the imaging process. “The Park FX40 takes care of all the set-up before and during scanning,” says Yoo. “All the tedious and time-consuming manual processes are now a thing of the past. The Park FX40 performs them all autonomously.”
The Park FX40 takes care of all the set-up before and during scanning. All the tedious and time-consuming manual processes are now a thing of the past
Ryan Yoo, executive vice-president of business development and strategic growth at Park Systems
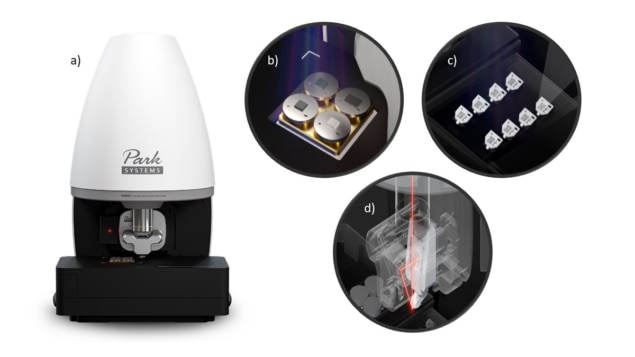
For a start, the Park FX40 uses a robotic system to automatically change and replace its own tips. Up to eight different cantilevers can be loaded onto a cassette, each one marked with a QR code to enable easy identification, and then a magnetic mechanism attaches the selected tip to the AFM head. Beam alignment is also automated, with an optical system used to locate the tip and ensure that the laser beam reflects off the cantilever onto the optical detector. “Tip exchange can be very frustrating for people who are unfamiliar with AFMs, and the beam alignment procedure can be very tiresome,” says David Faddis, the company’s technical manager for the Americas. “Automating these processes really improves the ease of use.”
The Park FX40 also features a unique dual-camera design that makes it much simpler to locate a region of interest. The first camera offers a view of the whole sample stage, which can accommodate up to four samples at a time, to allow the user to quickly find and select the target location. The stage then automatically moves to the chosen position, at which point the system switches to a high-resolution camera for a closer view that allows any final adjustments to be made.

Once in the correct location, the system automatically brings the probe close enough to the sample’s surface for measurements to be taken. The tip is first guided to within a few microns of the sample using an optical system, and then mechanical oscillations induced in the cantilever can be measured and input into a feedback mechanism that fine tunes the approach to the sample’s surface.
This feedback mechanism also allows the instrument to automatically adapt to the type of surface being scanned. “The system does a couple of global overview scans to get an idea of the topography, and from that sets up the initial feedback parameters,” explains Faddis. “During scanning the system looks ahead to the next line of the scan, and adjusts the feedback parameters to accommodate any rapid changes in topography. This also enables faster scanning, since the system can slow down to image rougher features, but can then speed up when it knows that the next line is flat.”
The result of all these innovations is that users no longer need to handle or understand the inner workings of the AFM to obtain high-quality measurements – and that’s a real benefit for researchers who typically need to acquire experimental data from several different instruments. “It’s great for large shared-user facilities, whether in industry or academia,” Faddis adds “It’s about focusing on the research, and not spending an excessive amount of time learning how to operate the system.”
Automating the manual processes will also enable scientists to measure more samples more quickly, which is a crucial advantage when many scientific advances depend on the speed and efficiency of experimentation. “The breakthroughs in automation of AFMs using artificial intelligence and robotics technology will dramatically boost our productivity and drive innovation across the field of nanometrology,” says James Hone, a professor at Columbia University and the first user in North America to have hands-on experience with the Park FX40.
Industrial focus
Although the Park FX40 is a major advance for research users of AFMs, it builds on Park Systems’ prior experience of building highly automated systems for industrial applications, such as semiconductor manufacturing. These high-end systems for the factory floor have been designed from the outset to enable first-time users to extract the same quality of data as more experienced personnel, and already include features such as automatic tip exchange and beam alignment.
Such large-scale industrial systems were also the main driver for developing the SmartScan operating software, now included with all of Park Systems’ AFMs, that allows the instrument to be controlled through a simple point-and-click interface. “For these industrial systems we designed as many ease-of-use features as we could,” says Faddis. “We have now brought the same level of automation to our research systems.”

Meanwhile, the optomechanical design of the Park FX40 has also been updated to boost the data quality and the precision of measurements. Here again, Park Systems engineers have benefitted from the experience gained from earlier designs, in this case a fast and accurate non-contact mode that has been achieved by decoupling the horizontal and vertical scanners. “That decoupled technology has been the hallmark design for all our AFMs,” says Faddis. “It gives you very precise measurements with no out-of-plane background motion, while the non-contact mode means that a single tip can be used for hundreds of scans with no loss of resolution.”
Faddis explains that more recent models, including the Park FX40 and the previous NX series, have more effectively integrated this non-contact mode into the instrument design. Mechanical noise has also been reduced to enable more accurate measurements to be made on larger samples, with the Park FX40 reducing the raw out-of-plane motion without image correction to less than 2 nm over a scan range of 80 μm. “The FX40 is the culmination of all the work we’ve done to optimize non-contact mode in the past,” he says.
Park Systems believes that combining such high precision with much simpler operation will widen the appeal of AFMs to more users working with different materials and in more diverse applications. “More than a business strategy, automation is a fundamental advance that will grow the AFM industry itself,” says Yoo. “Such innovation may finally push the boundary and enable AFM to capture opportunities that are currently dominated by established microscopy industries such as electron or optical techniques.”


