A new X-ray imaging technique that uses sticky, or Scotch, tape as a diffuser to generate “speckle” patterns makes it possible to characterize strongly curved X-ray mirrors in two dimensions with nanoscale precision. The new technique could find use in super-precision metrology, while also aiding the development of next-generation X-ray mirrors for upgraded synchrotrons.
X-ray mirrors are routinely employed in synchrotron radiation facilities, X-ray free-electron lasers and X-ray telescopes. Such mirrors have become increasingly smooth in the past few years thanks to advanced polishing techniques and now boast “slope errors” smaller than 50 nanoradians rms (root mean square). While this is a boon for many applications, the downside is the mirrors are so smooth that existing metrology techniques can no longer be used to characterize them.
Speckle angular measurement
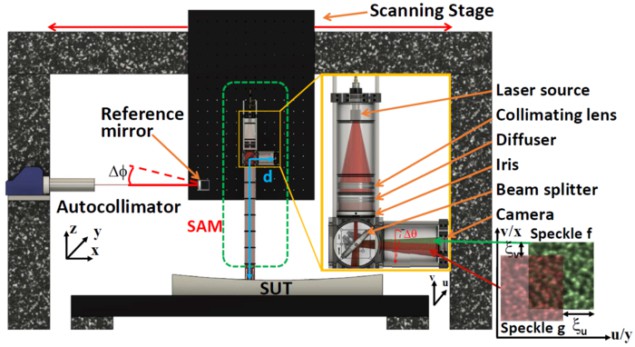
Researchers led by Kawal Sawhney, Hongchang Wang and Simone Moriconi from the Optics and Metrology group at the UK’s Diamond Light Source have now developed a new instrument and technique based on “speckle angular measurement” (SAM) that remedies this need. Indeed, in their work, which they describe in Light: Science & Applications the researchers show that they can push the angular precision of slope error measurements down to just 20 nanoradians rms thanks to an advanced sub-pixel tracking algorithm.
The SAM technique generates two-dimensional random intensity patterns (the speckles) by shining a laser through a “diffuser” made from good old sticky tape. Since the tape is see-through, the laser light can pass through it and generate the speckle patterns, with any variations in the slope of the mirror shifting these patterns. The researchers can then determine the exact value of these variations to the nanoradian level by precisely tracking the speckle shift with the algorithm they developed.
Unlike other techniques, the new method does not require high-precision optics and the samples do not need to be rotated during the experiments. The technique is also simple as it only requires Scotch tape.
Complement existing metrology methods
The researchers say the SAM instrument might also be used to measure toroidal, ellipsoidal and paraboloidal mirrors by raster scanning across the entire mirror surface. This type of technology would be straightforward to integrate into existing measurement probes, too, and thus complement other imaging methods. As well as characterizing synchrotron X-ray mirrors, it could have applications for characterizing freeform optics and extreme ultra-violet high-quality mirrors, with possible extensions to the inspection of biomedical and materials science samples.
Diamond Light Source – when a tool becomes a gem
The new nano-metrology technique could also aid the development of next-generation super-polished X-ray mirrors that are required for upgraded synchrotron facilities such as Diamond, the researchers say. “This novel instrument will enhance the capabilities of our state-of-the-art metrology laboratory at Diamond and enable us to metrology test the extremely high-quality X-ray mirrors required for use with the planned upgrade of Diamond to a low-emittance Diamond-II source,” Sawhney says. “Vendors of X-ray mirrors will also find this new instrument attractive as it will enable them to fabricate even better-quality optics than at present.”

